A Step-by-Step Guide: How to Partition Your C Drive
As computer storage needs continue to evolve, managing your hard drive efficiently becomes increasingly important. One effective way to optimize your system’s storage space is by partitioning your C drive. Partitioning involves dividing your hard drive into separate sections or partitions, each of which can be used for specific purposes. This guide will walk you through the process of partitioning your C drive, providing step-by-step instructions, tips, and FAQs to help you achieve a well-organized and efficient storage setup.
Why Partition Your C Drive?
Partitioning your C drive offers several benefits:
Organizational Brilliance: A Structured Digital Universe
Visualize your C drive as a vast terrain, waiting to be tamed. Through the art of partitioning, you can carve out distinct domains for your operating system, applications, and personal data. This results in an organized hierarchy that’s effortless to navigate, manage, and safeguard.
Imagine this:
- Partition C: Dedicated to the Operating System (OS);
- Partition D: Reserved for Applications;
- Partition E: The Abode of Personal Data;
- Partition F: A Haven for Media and Entertainment.
This meticulous segregation transforms your storage into a symphony of order, making it a breeze to locate essential files, whether it’s a vital document or a treasured photo album. Moreover, this structure facilitates streamlined backups, as you can selectively target specific partitions without the hassle of sifting through a chaotic amalgamation of files.
Performance Pinnacle: Elevating Speed and Agility
Envision your computer’s performance as an intricate symphony, where each partition plays a distinct melody. By allocating tasks to designated partitions, you can orchestrate a harmonious performance that optimizes your system’s capabilities and maintains its tempo.
For instance:
- Separating the OS from data diminishes fragmentation, enabling swift read and write operations;
- Assigning a dedicated partition for resource-intensive applications ensures they don’t encroach on system resources, boosting overall speed.
This meticulous allocation of responsibilities culminates in a responsive system that surges through tasks with unparalleled efficiency.
Data Citadel: Safeguarding What Matters Most
In the unpredictable landscape of digital hazards, security reigns supreme. This is where partitioning emerges as your digital sentinel, guarding your data with unwavering diligence. In the face of a catastrophic system crash or malicious malware infiltration, partitioning serves as your fortress.
The strategy is simple yet effective:
- Isolate your operating system from critical data, erecting virtual barriers that shield your personal files from harm;
- This insulation ensures your cherished memories, vital documents, and precious projects remain invulnerable in the face of adversity.
Diverse Realities: Embracing Multi-Boot Adventures
Are you an intrepid explorer of operating systems, lured by the prospect of diverse digital domains? Partitioning is your trusty compass for navigating the captivating realm of multi-boot setups. Whether it’s the sleek sophistication of macOS, the flexibility of Linux, or the familiarity of Windows, you can seamlessly coexist within these parallel universes on a single machine.
Imagine:
- Partition X: Home to macOS;
- Partition Y: The Realm of Linux;
- Partition Z: A Sanctuary for Windows.
This harmonious cohabitation allows you to indulge in experimental ventures, learning journeys, and productive endeavors, all within the confines of your computer.
Effortless Maintenance: The Symphony of System Care
Just like a finely tuned instrument, technology thrives on consistent maintenance. Partitioning simplifies this process by compartmentalizing the various components of your digital orchestra.
Imagine a scenario:
- You wish to upgrade or reinstall your operating system;
- With partitioning, this task becomes seamless. Format the OS partition while preserving your invaluable data on separate partitions.
This strategic approach mitigates the risk of unintentional data loss during maintenance, rendering the entire process less daunting and more manageable.
Step-by-Step Guide to Partitioning Your C Drive

Note: Before proceeding, ensure you have a complete backup of your important data to prevent data loss during the partitioning process.
| Step | Action | Description |
|---|---|---|
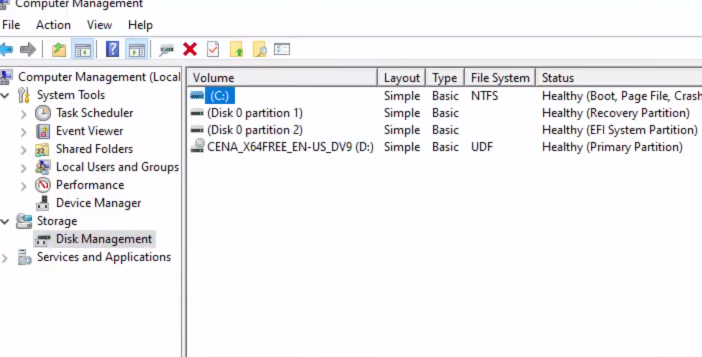
| Step 1 | Open Disk Management | Press Win + X to reveal a menu of possibilities. Confidently select Disk Management to set the stage for partitioning. The disk layout emerges, and your eyes fixate on your majestic C drive. |
| Step 2 | Shrink C Drive | Right-click on your C drive partition, igniting anticipation. Hover over Shrink Volume, granting your C drive room to breathe. With determination, specify the space to be released, imagining the new partitions about to grace your screen. |
| Step 3 | Create a New Partition | Unallocated space beckons as a blank canvas, ready for your creative touch. Right-click summons innovation, presenting the choice: New Simple Volume. The wizard takes center stage, guiding you through decisions. Size specifications flow like brush strokes on canvas. Choose a drive letter as its symbol of identity, adopting NTFS as the foundation for your new creation. |
| Step 4 | Complete the Wizard | A new entity emerges, needing a name that captures its essence. With responsibility, bestow a label upon it. A choice arises – quick format or full format? The speed of quick format entices the impatient, while the allure of full format baptizes data purity. The wizard exits, leaving a sense of accomplishment. |
| Step 5 | Formatting and Assigning Drive Letter | Baptism by format arrives. Right-click to Format, transforming unformatted potential into structured data. Declare order with NTFS as the preferred language for your partition’s organization. Bestow a label as its identity’s signature, and assign a drive letter, a key to its realm. |
| Step 6 | Post-Partitioning Steps | Reality dawns for your new partition. Organize files with purpose, embracing the partition’s new home. The C drive sighs in relief, freed from clutter now gracing its sibling. Applications find abode, OS-bound apps on the C drive, others dispersed like settlers claiming digital land. In this digital evolution, honor the wisdom of regular backups – as partitions fortify, backups stand as guardians of data’s journey. |
Tips for Efficient Partitioning

Planning Your Partitions
One of the key principles of effective partitioning is meticulous planning. Designing partitions tailored to your needs prevents both wasted space and constrained resources. Check out Table below for recommended partition sizes to consider during your planning phase:
| Partition | Purpose | Recommended Size |
|---|---|---|
| / (Root) | OS and System Files | 30-50 GB |
| /home | User Data | 50-100 GB |
| /var | Variable Data | 20-30 GB |
| /swap | Swap Space | 2 * RAM Size |
| /tmp | Temporary Files | 10-20 GB |
Future-Proofing Your Storage
Anticipating future requirements is crucial to prevent outgrowing your partition sizes. Think ahead for upcoming OS upgrades and software installations. Allocate extra space to accommodate these changes, avoiding the need for resizing partitions later.
Prioritizing Data Safety
Before embarking on any partitioning endeavor, prioritize data safety. Accidents can happen, and safeguarding your valuable data is paramount. Always back up your data to an external source before beginning the partitioning process.
Enhancing System Performance
Don’t let resource-intensive applications bog down your system. Improve performance by isolating these applications onto separate partitions. This separation prevents one demanding process from affecting the overall system speed.
Sustaining Partition Health
Just as regular exercise keeps your body in shape, consistent maintenance keeps your partitions in optimal condition. Follow this maintenance checklist to ensure partition longevity:
- Check Partition Health: Use disk utility tools to monitor partition health and identify any issues promptly;
- Perform Disk Cleanup: Regularly clean up temporary files, cache, and unused data to free up space;
- Defragmentation: If using traditional hard drives, consider occasional defragmentation to improve data access speed;
- Update Software: Keep your partition management software up to date for improved compatibility and security.
Conclusion
Partitioning your C drive can greatly enhance your computer’s organization, performance, and data safety. By following this step-by-step guide and considering the provided tips, you’ll be able to efficiently partition your C drive and manage your storage space effectively. Remember, proper planning and regular maintenance are key to maintaining a well-organized and optimized storage setup.
For a better understanding of the partitioning process, you can watch this video link.
FAQ
Yes, you can shrink the C drive to create unallocated space without losing data. However, creating a new partition will involve formatting, which will erase any data on the new partition. Always back up important data before proceeding.
New partitions are automatically assigned drive letters. You can access them through File Explorer, just like any other drive.
Yes, you can use the Disk Management tool to resize, extend, or shrink partitions later. However, be cautious, as resizing partitions might result in data loss if not done correctly.
Yes, you can shrink your C drive with data on it to create unallocated space. However, creating a new partition will format that space, erasing any existing data.
Primary partitions are used for bootable operating systems, while logical partitions are used for data storage. You’re limited to four primary partitions, but you can create multiple logical partitions within an extended partition.
While you can delete partitions, it’s important to note that doing so will erase all data on that partition. There’s no direct way to “undo” partitioning without restoring data from a backup.

